Thursday, 13 November 2008

Adding a subsite in Silverstripe

Assuming you've got the subsites module installed and created your first subsite 'Template' manually, you can now go about adding subsites!

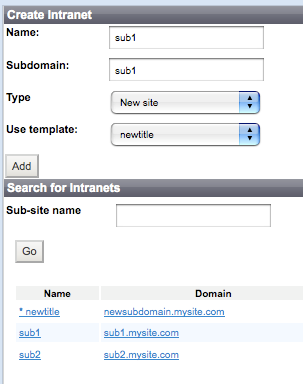
Click on the Sub-sites tab at the top of the Silverstripe CMS to add a new subsite.

You will see this panel on the left hand side. Just enter a name and subdomain and click add.

You can see I've already added two domains here which point to http://sub1.localhost and http://sub2.localhost

Each new subsite is based on a 'Template', so in this case will have the domain 'mysite.com' appended.

I first tried setting this up in my home directory but Silverstripe could not resolve addresses of the form http://sub1.localhost/~username/

Once I installed Silverstripe to the main apache Documents folder it worked no problem, i.e. Silverstripe will resolve http://whatever.localhost/

In my case, because I'm developing locally I added the following entries to my /etc/hosts file:

127.0.0.1    sub1.localhost
127.0.0.1 sub2.localhost


Happy subsiting...

Monday, 10 November 2008

Install Silverstripe 'Subsites' module

The following steps worked for me when installing the Silverstripe Subsites module:

1. Create a directory in your root silverstripe installation. '~/Sites/silverstripe/subsites'

Download, and unzip the code into this directory. I deleted the 'trunk' directory to keep things tidy.

2. Ensure every folder in your silverstripe hierarchy has the user '_www' read/write access

3. There is a problem linking the Group table in the database, so for now comment it out in 'silverstripe/subsites/_config.php' so it looks like this:
<?php

/**
* The subsites module modifies the behaviour of the CMS - in the SiteTree and Group databases - to store information
* about a number of sub-sites, rather than a single site.
*/


Object::add_extension('SiteTree', 'SiteTreeSubsites');
// Hack - this ensures that the SiteTree defineMethods gets called before any of its subclasses...
new SiteTree();
Object::add_extension('ContentController', 'ControllerSubsites');
Object::add_extension('LeftAndMain', 'LeftAndMainSubsites');
Object::add_extension('LeftAndMain', 'ControllerSubsites');
//Object::add_extension('Group', 'GroupSubsites');
Object::add_extension('File', 'FileSubsites');

?>


Then visit http://localhost/silverstripe/db/build?flush=1 This will set up the initial database tables for the subsites module.


5. We need to manually modify the Group table using the following SQL. Note that 'Group' is a reserved keyword in mysql so make sure you wrap it in backquotes:

alter table `Group` add SubsiteID int(11) not null default 0;

6. We also need to manually insert the first 'Template' into the Subsite table:

insert into Subsite (ID, ClassName, Created, LastEdited, Subdomain, Title, Domain)
values ("", "Subsite_Template", NOW(), NOW(), "newsubdomain", "newtitle", "mysite.com");

7. Now you can uncomment your 'silverstripe/subsites/_config.php' file and add the following two lines so that it looks like this:

<?php

Object::add_extension('SiteTree', 'SiteTreeSubsites');
// Hack - this ensures that the SiteTree defineMethods gets called before any of its subclasses...
new SiteTree();
Object::add_extension('ContentController', 'ControllerSubsites');
Object::add_extension('LeftAndMain', 'LeftAndMainSubsites');
Object::add_extension('LeftAndMain', 'ControllerSubsites');
Object::add_extension('Group', 'GroupSubsites');
Object::add_extension('File', 'FileSubsites');

Director::addRules(100, array(
'admin/subsites/$Action/$ID/$OtherID' => 'SubsiteAdmin',
)
);
Object::addStaticVars( 'LeftAndMain', array( 'extra_menu_items' => array(
'Sub-sites' => array("intranets", "admin/subsites/", 'SubsiteAdmin')
)
)
);

?>


For good measure, visit http://localhost/silverstripe/?flush=1 to make sure any database changes have been picked up.

8. Then visit http://localhost/silverstripe/admin?flush=1 to reload your CMS.
You should now have the 'Sub-Sites' tab in the Silverstripe admin CMS along with a dropdown in the top right hand corner that allows you to select which subsite you are currently working on.

Documentation for this module is in alpha ;-) , so if anyone has any tips on refining these installation instructions please let me know.

Thursday, 6 November 2008

iconv will not link when compiling PHP on OSX

When trying to compile PHP on OSX Leopard, the ./configure command completed successfully but iconv would not link....

Undefined symbols:
"_iconv_close", referenced from:
_php_iconv_string in iconv.o
__php_iconv_strlen in iconv.o
__php_iconv_strpos in iconv.o
__php_iconv_mime_decode in iconv.o
_zif_iconv_substr in iconv.o
_php_iconv_stream_filter_dtor in iconv.o
_zif_iconv_mime_encode in iconv.o
"_iconv_open", referenced from:
_php_iconv_string in iconv.o
__php_iconv_strlen in iconv.o
__php_iconv_strpos in iconv.o
__php_iconv_mime_decode in iconv.o
_zif_iconv_substr in iconv.o
_zif_iconv_mime_encode in iconv.o
_php_iconv_stream_filter_factory_create in iconv.o
ld: symbol(s) not found
collect2: ld returned 1 exit status
make: *** [sapi/cli/php] Error 1

I believe this is a problem with the default /usr/include/iconv.h header file in Leopard.

I have a different version of iconv.h installed with Fink which puts all it's software in /sw
I added the following to the ./configure command's options, as suggested here.

--with-iconv=shared,/sw


This would not work unless 'shared' is specified. Perhaps this is because Fink compile iconv as a shared library.

Wednesday, 5 November 2008

Broken Web Sharing / Apache on OSX Leopard

I recently installed Leopard on my macbook and wanted to enable Web Sharing but when I visited http://localhost, Firefox gave me the following error:
Failed to Connect
Firefox can't establish a connection to the server at io.
I tried to uncheck/check Web Sharing in System Preferences. I also tried stopping/starting Apache on the command line with no luck.

Finally I used this resource on DIYMacServer to reinstall Apache on my machine. It now works like a charm, thanks Richard!

(This all came about because I want to install SilverStripe which suggests using MAMP, but I did not want multiple versions of Apache installed on my machine.)

Wednesday, 8 August 2007

Association Callbacks

Similiar to the normal callbacks that hook into the lifecycle of an Active Record object, you can also define callbacks that get trigged when you add an object to or removing an object from a association collection. Example:
class Project
has_and_belongs_to_many :developers, :after_add => :evaluate_velocity

def evaluate_velocity(developer)
...
end
end

It’s possible to stack callbacks by passing them as an array.

Possible callbacks are: before_add, after_add, before_remove and after_remove.

Should any of the before_add callbacks throw an exception, the object does not get added to the collection. Same with the before_remove callbacks, if an exception is thrown the object doesn’t get removed.

Monday, 9 July 2007

ssh segmentation fault osx

Argh!! Every time I install an update on my MacBook it breaks ssh. Up until now I'd been using Pacifist to extract & reinstall the Kerberos Framework from the 10.4.8 update, as per these instructions.

I'm now having to do this on a regular basis which is very annoying and I'm getting concerned that replacing Kerberos with an older version is introducing security holes. so I've decided to install Fink and openssh instead of using Apple's ssh.

Thursday, 5 July 2007

Deploy Rails on Windows: Part 3

This is the last part of a series of posts on deploying Rails on a windows server using Oracle, Mongrel & Pen. My thinking: get it working with a simple app first, to minimise headaches later. The other parts can be found here:
  1. Installing Rails
  2. My-first-app with Oracle
  3. Pen of pesky Mongrels
This part heavily references a talk given by Brian Hogan at RailsConf

Part 3: Pen of pesky Mongrels
Before you go any further, make sure your app works in production mode!

Install Mongrel

The easiest way to get started with Mongrel is to install it via RubyGems:

gem install mongrel

Select the highest stable version number marked (mswin32).

Run Mongrel in the background with:

cd myrailsapp
mongrel_rails start -d

and stop it with:

mongrel_rails stop

There’s quite a few options you can set for the start command. Use the mongrel_rails start -h to see them all.


Mongrel as a Service


Install the gem (pick the most recent one):

gem install win32-service
gem install mongrel_service

Install your app as a service:

mongrel_rails service::install –N comics_4001 -c c:\my\path\to\myapp –p 4001 –e production

Your app will then appear under ‘services’ in Computer Management (accessed via Control Panel or by right clicking on My Computer)

You can then set the service to start automagically. Right click on ‘comics_4001’, choose ‘properties’ and change the startup type to ‘automatic’.

This is really all you need for a small application – perhaps an internal company app or something.

Cons:
  • You don’t get page caching
  • Doesn’t scale
  • Rails is single threaded so user requests get queued up.
While rails is serving an action to one user, all the other users need to wait. This is bad if some of your actions take a while, which is why we need Pen...


Load Balancing Mongrels with Pen

Pen requires cygwin1.dll, so make sure it’s in the same directory as pen.exe. Also, make you get the one with the ‘a’ suffix – the other version doesn’t work for some reason.

To run pen as a service you need the Windows Server Resource Kit Tools. Install it somewhere. To keep things simple I'll use c:\reskit

Start a couple of mongrels:

mongrel_rails service::install –N comics_4001 -c c:\my\path\to\myapp –p 4001 –e production
mongrel_rails service::install –N comics_4002 -c c:\my\path\to\myapp –p 4002 –e production

You could write a batch file to start and stop these multiple servers.

The following command will balance your mongrels just fine:

pen 4000 localhost:4001 localhost:4002

But to do things properly, keep reading.


Pen as a Service

Install pen as a service using srvany.exe from the reskit:

c:\reskit\instsrv Pen c:\reskit\srvany.exe
>> The service was successfuly added!

Set some parameters with regedit. Go to 'HKEY_LOCAL_MACHINE\SYSTEM\CurrentControlSet\Services\Pen' and add a new key called 'Parameters'. Add the following three String values to the parameters key:
  • Application = pen.exe
  • AppParameters = -f 4000 localhost:4001 localhost:4002
  • AppDirectory = c:\pen
Start the pen service from ‘Services’ or with the command:

net start pen

Remove with:

sc delete pen

Pen will then chug along happily and is suitable for most apps with a few users. You still don’t get page caching, for that you need Apache, but this solution is free, simple and performs moderately well.